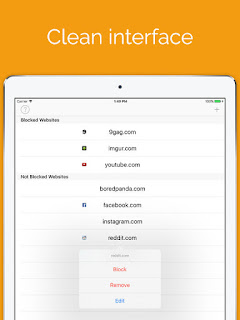
If you’ve been looking for a distraction blocker for your iPhone and iPad, look no further. With Self Control, you can add any sites that you want to block to your blacklist. You can block all of those sites if you want, are just a few of them. It’s a great way to save time, and stop browsing Reddit when you should be doing coursework.
Self Control is a simple to use app, and it works well, as it should. You add a website by tapping on it, and then block. You can add your own url you want to block by tapping the plus button.
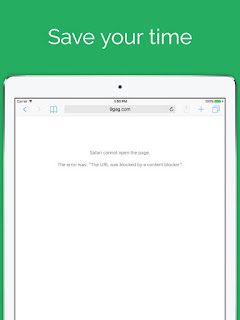
When you try to get onto a website that’s blocked, it simply doesn’t load, and Safari shows you the reason.
And that’s it! The page is now unblocked. If you’d like, you can go back to unblock it. Self Control works great – if you use Safari. If you use a third party web browser, it doesn’t work on those. This is because iOS only allows it to access Safari, and iOS doesn’t allow third party apps to interact with each other, apart from using x-callback-url obviously. Note that this is a limitation of the operating system, not the app.
All in all, it’s a great app, and it does its job well. It blocks the whole site for the URL you put in, which is pretty useful. There are some features I’d love to see added though:
A timer feature that stops you from unblocking sites for a certain amount of time.
Blocking only subdomains of websites.
Setting individual timeout timers for sites.
I really recommend that you check out Self Control on the App Store. You can pick it up for $1.99, and it is certainly worth the purchase!
I’ve finally added donations! You may be wondering what the benefits are. These things will be added over time as the money becomes available.
Premium URL
Something I wanted for a while – it would make The Nerdy Student look more professional, and would improve the site.
Nicer theme
Whilst I’m a fan of the current theme, I’d love to get a custom snazzy theme.
More apps and tech to review
I get gifted a lot of my apps and tech, that is true. However, there are some apps and tech that I would love to review that I can’t unless I have the money – Scrivener and Ulysses for example.
And more!
Please consider donating – it would help me a lot!
I’m excited to announce yet another giveaway – three months of Todoist Premium, free! I’m doing this giveaway because the blog just passed over 60,000 page views. Be sure to enter!
If you don’t know what Todoist is, be sure to check out my blog post on it here!
All you need to do is subscribe to The Nerdy Student via email, and sign up with the form.
Enter your email address to subscribe to The Nerdy Student
Linky is an awesome share extension app that allows you to quickly and easily share quotes, websites and anything you find on the internet quickly and easily to your Twitter or Facebook accounts.
Linky is a tool that allows you to share quotes, websites or anything else you find on the internet to your Twitter and Facebook account. You can share websites, quotes, and even text shots with Linky.
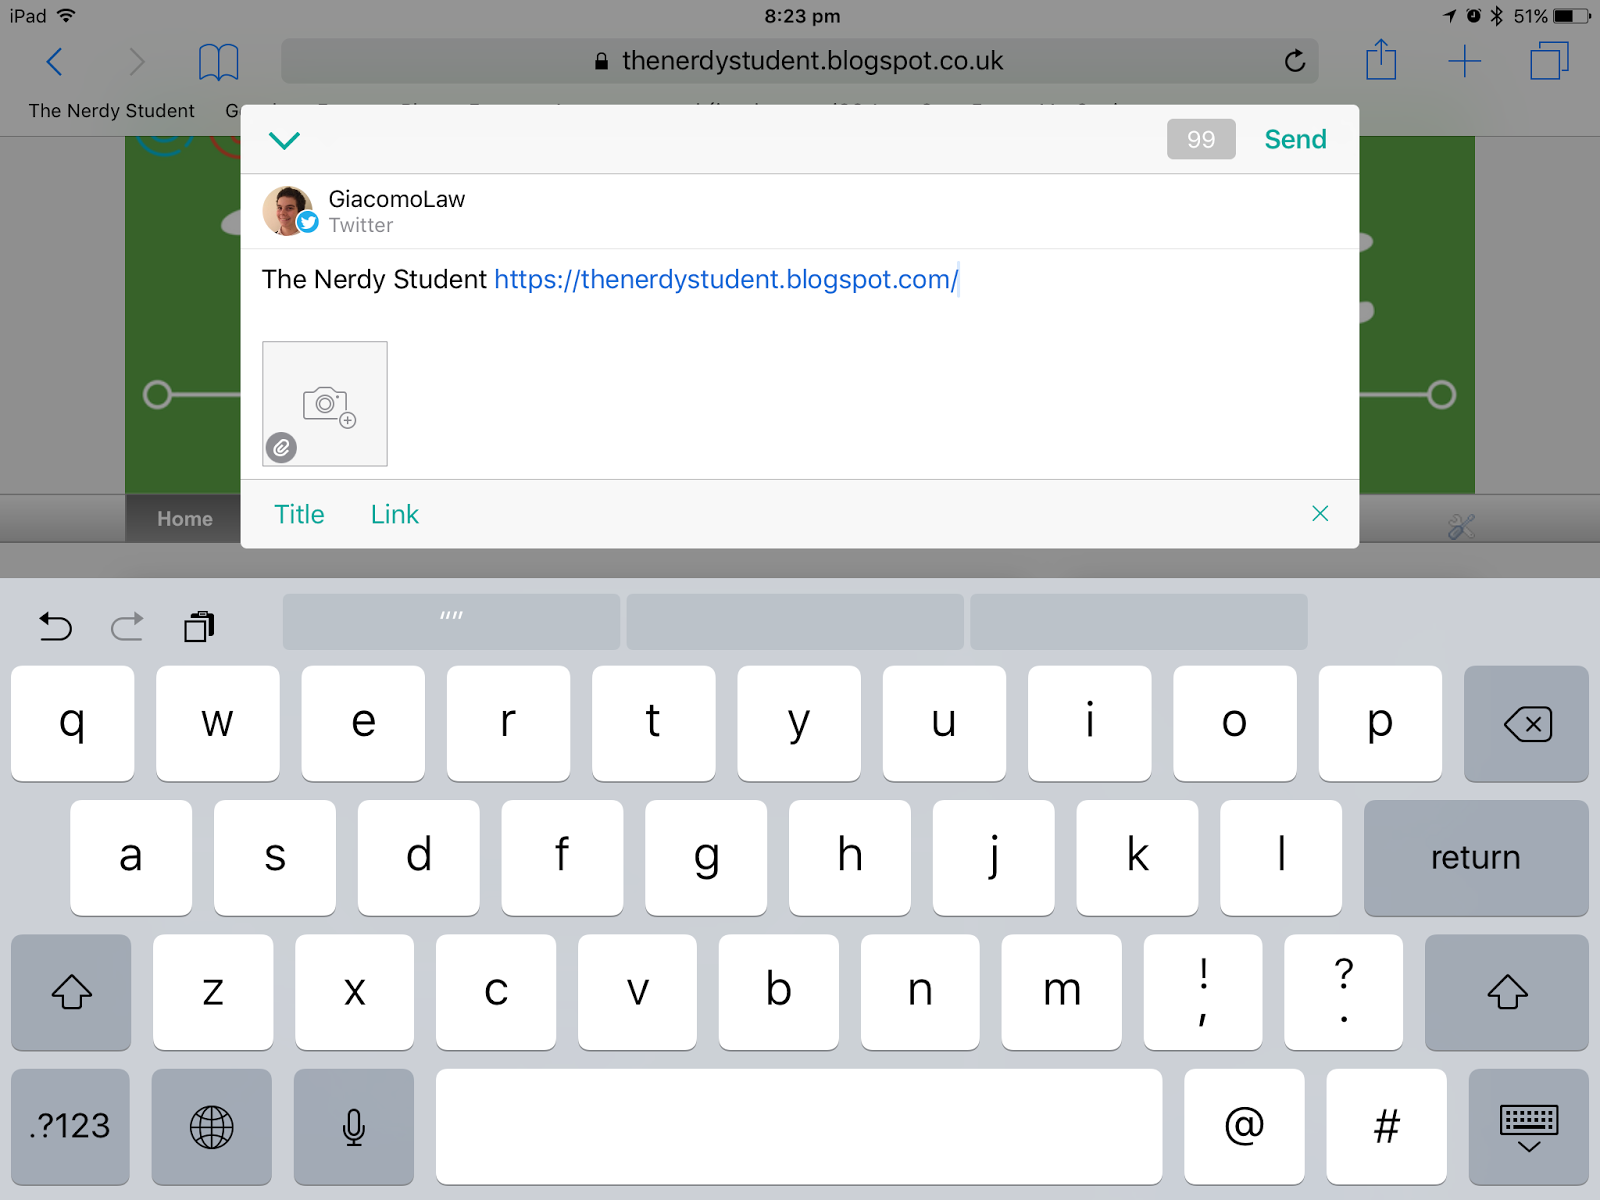
To get started with Linky, you simply tap on the share extension and hit the Linky button. The window that pops up will automatically show the title of the page you were on, along with the URL of that page. You can change whatever it says, and you can even tap on ‘Title’ to add the page title, or ‘Link’ for the page link. I find that feature very useful.
One thing that really impressed me about Linky was the way it showed mentions. When I put the ‘@’ symbol, it quickly loaded some accounts I had recently tweeted to, and these updated as I started typing in the account name. Lot’s of widgets don’t have this, and I have found the native Twitter one to be a little hit and miss, so this certainly surprised me.
Another cool feature is that if you highlight text, you can hit share and Linky will add that text into your tweet. You can tap on photos, and Linky will show you your most recent photos. If you share a URL, Linky will suggest a photo that was on that site to add to your post.
This really impressed me – you could convert text into tweet shot. I really like this feature, and Linky makes it look awesome! If your tweets a little too long, you can simply turn it into a tweet shot that looks great, and has all the text you want. This is my favourite feature Linky has!
A useful feature that Linky has is the option to annotate images. I like the magnifier, which you can place over an image to magnify a region you want attention to, and the arrows allowing you to draw attention to other areas of the image.
I really recommend going to the App Store and checking this app out – it’s really good, and I sure love using it! It’s $3.99 on the App Store, and it’s a great app to use. You can check out the Linky website here.
The Chipolo Plus is a coin shaped bluetooth tracker that you attach to anything you don’t want to lose. With the companion iPhone, Android or web app, you’ll know that you won’t lose anything again.
The Chipolo is a little bluetooth tracker that you add to things you don’t want to lose. It looks like a coin, and is thin, light and simple. You pair it with an app, and you’re all good. The app is what makes Chipolo special. Let’s say you drop your wallet when you’re out and about. The app can connect to the Chipolo as far as 200 ft. Once the app loses connection to the Chipolo, your phone will alert you that it has lost connection. Now here is where the magic happens – the app shows you on the map where your Chipolo’s last known location was – so where the app lost connection. You go back to this area, and the app connects to your Chipolo. You can then ring it, and you’ll most likely be able to hear it. It’s got a very loud tone.
If you still can’t find it in the area that it was last known to be in, Chipolo still has an awesome feature that can save you. You can enable the community feature, which means that if anyone with Chipolo installed on their phone walks past your Chipolo, you’ll get notified. I think this is an awesome feature, and certainly makes Chipolo stand out from the rest. However, remember that this depends on the amount of users Chipolo has, meaning that the more it has, the more likely your item will be found.
All this being said, check out the Chipolo video below to get a quick summary:
Now onto the review bit. Chipolo comes in a neat little box, which is easy to open and straightforward, something I like. I prefer simple packaging to over complicated ones, and the Chipolo still looks great and is simple at the same time.
Your Chipolo is in a little plastic holder, and you simply pull it out. Then, below there is a keyring that you can attach to your Chipolo to. Along with the Chipolo itself and the keyring, it comes with a handy quick start guide that tells you where to find the app and how to set it up. On the other side of a box, a few uses of Chipolo are displayed, as well as how to quickly get started.
I quickly downloaded the app on my phone, and was very surprised by how quick it was to set up the Chipolo. You’ll need to switch on your bluetooth to work with the Chipolo, as that is how it connects to it (I’ll explain about how it works a little later in the post). Just firmly press your Chipolo and listen for the sound, then hold your Chipolo next to your phone. It will take a few seconds to connect, and then you are done.
The app will take you through a small guide on how to use the app, and then you are good to go. Make sure to name your Chipolo something that makes sense – for example ‘keys’ if you put it on your keys.
You’ll now see the Chipolo screen, which is all about your Chipolo and where it is. I love the way the Chipolo screen is shown. You can quickly see the location, or last known location. You can ring it, as well as customize it.
The Chipolo app comes with a handy feature – named locations. Here, you can mute in range and out of range notifications, so if you are at home or school for example. Another awesome feature it comes with is a bluetooth strength meter. Tap on the Chipolo circle above the name of it, and it turns into five dots. If the largest dot is closest to you (at the bottom) your Chipolo is near by. If it’s far away, at the top of the screen, your Chipolo is far away. This means that if you can’t hear your Chipolo, you can use the meter to get closer to it, and then you may eventually hear it.
I’ll go over Community Search again, as I think it’s a great feature. If you can’t find your Chipolo, you can enable notifications. This means that if someone with Chipolo on their phone walks past your Chipolo, you’ll get notified that they had just found it, along with the location updated to show where the Chipolo is. I love this feature, and I really think it makes the Chipolo stand out from the rest.
Another great feature is that if your phone is missing, you can click on your Chipolo, and it turns the volume up on your phone and then starts playing a tone. This even happens if the Chipolo app is closed on the phone, and if the phone is in lock mode.
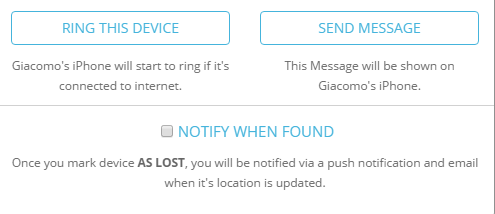
‘What happens if I lose my phone and my Chipolo?’ you may be wondering. Well, you’re still covered. Just head over to the Chipolo website tracker and you’ll be able to see all the last known locations of your Chipolo’s and your devices with the Chipolo app running on them. For your Chipolo, you can select Notify when Found to get a notification if a community member walks past, or for your phone you can send a message to it that says that the phone is lost, and to email a certain email or call a certain number. You can customize this message.
A more fun feature the Chipolo app offers is the option to take a photo with your Chipolo. On the app, open ‘Take a Selfie’, and then you can click the Chipolo to take a picture. I don’t really see the point of this, but it is fun to muck around with.
I’ve found that the bluetooth varies over distances. In parks, its the full 200 ft promised, but in houses and flats the range was around 80 feet, but that is to be expected.
There are two tiers of Chipolo – Chipolo Plus, and Chipolo Classic. Chipolo Plus is waterproof, whilst Chipolo Classic is not. You can read the details in differences Both of the tiers cost £20.99.
However, Chipolo Plus does not have a replaceable battery. The battery in it only lasts for 12 months, and then you have to buy a replacement, but you get 50% of the replacement via the Chipolo renewal program. The Chipolo Classic has replaceable batteries, which each last from 3 to 6 months. It uses CR2025 batteries, which you can pick up at any old shop. The app tells you when you’re running low, and that you will need a replacement battery/Chipolo soon.
Be sure to check out more detail on the differences here.
Here’s a quick sum up of the Chipolo:
Pros
Relatively cheap compared to competition.
High quality build.
Awesome app.
Good customer support.
Loud!
Lots of colours to choose from.
Waterproof if you choose that model.
Cons
The waterproof Chipolo, the Plus, does not have changeable batteries.
Bluetooth range varies with conditions and distance.
No way to get welcome screens back in the app.
All in all, I really recommend checking the Chipolo out. From what I have seen, its cheaper and better than it’s competition out there, and I have found it very useful whilst I have been using it.
If you buy via this link, you get 20% off! That’s £4.20 off if you buy one, meaning you only pay £16.79.
One of my biggest problems when I went on holiday was that I couldn’t update and fix my websites and apps with just my iPad on GitHub. I could have just used the GitHub web editor, but I often found that it didn’t save my changes, and that was a huge problem if I had just made a lot of edits. However, my biggest problem was updating the website via FTP. None of the apps on the App Store helped to solve this issue. However, Textastic, Working Copy and Buddy solved my problem perfectly.
Evernote is a great app to take notes anywhere you are, from your phone to your desktop. Whilst it is already packed with features, there are many features I would love to see added, and this post has the top five I would like to see.
Markdown support or headers
I use a ton of headers when using Evernote. At the moment, I either have to use Drafts 4 to take notes on my tablet, or struggle around with font sizes, bold and underlining on my pc. It would be great if Evernote added native markdown support, or even header 1, header 2 and more. It would help me to get notes down quicker, and I know many other people would also love to see this feature.
Office documents shown better
Whilst Evernote does have nice support for Office documents, being able to search them and all, it would be great if the documents had a preview in the note, sort of like PDF files do. Some of my Word files in Evernote have similar file names, so I have to go around and open every one of them up. With a preview, I could quickly find the one I wanted.
Presentation mode and PDFs
I know this is possible, as I have seen it working on the Mac version. On Windows presentation mode, clicking on a pdf opens it in an external PDF viewer program, in my case Foxit Reader. This firstly does not look great, and sometimes its quite slow. It would be great if the PDF’s were shown in the presentation mode, and you did not have to open them in another app.
Remove the ‘Expunging notes’ when deleting notes
This is one of my major annoyances. When I delete notes on Windows, it comes up with a windows saying ‘Expunging notes’, with a loading bar in it. Firstly, it takes ages for even one or two notes, and secondly and mainly, you can’t use Evernote whilst this thing is up. Older versions of Evernote for Windows never had it, and I don’t see why this one has to have it either.
Universal font sizes
I’ve noticed that the font sizes on the web client are different to the Windows app font sizes, and the iOS app does not even have font sizes. I’d love Evernote to sort this out, and make font size ’10’ the same size across all platforms. It really makes your notes look messy when you start a note on your pc, and end it at school on the web version, as all the font sizes are different.
A button for superscript and subscript on all platforms
I’m pretty sure that you can get a keyboard shortcut on Windows that allows you to add superscript and subscript in your notes, but you can’t on iOS. I use my iPad as my main device at school, and often I have to use Latex to add superscript and subscript. I would love to see support for this on the iOS version, as it would make chemical equations and the like a lot easier to do.
So those were the top things I would love to see in Evernote! Obviously, I’d also like to see improvements to the Windows app, such as bug fixes and more, but these features and changes would really improve Evernote for me.
Thanks for reading!
What would you like to see added to Evernote? Feel free to comment below!
You may have heard about the new Evernote privacy policy. To sum it up, it allows EN employees to see what your notes contain. You can read the official post here.
Evernote say they are doing this to increase their machine learning, and how EN works. Whilst I’m all for improving Evernote, I don’t really like the idea of Evernote reading my notes. I’ve seen the explosion on the internet about how Evernote will start reading your data, but I really don’t think that it will be that bad. If Evernote hires them, I trust them to manage my data.
Besides, companies such as email clients, chat services and more can see what you input, so I don’t see why this is such a shock. Also, EN said on their post that you could disable it if you really want: In reality, machines still need a human to check on them. To get there, Evernote data scientists need to do spot checks as they develop the technology. We’ll introduce this change on January 23, 2017, but you control whether or not your data is used for this purpose at any time. I’ll be sticking with EN. It’s where everything I have is, and I don’t think that this is such a big impact. I’m not going to lose a great product due to a small adjustment that they made.
Thanks for reading!
What do you think of the new privacy policy? Feel free to comment below!
PCalc is a great calculator for your Apple devices, from your Apple TV to your Apple Watch. It’s easy to get going with, but also comes packed with advanced functions. It also has a ton of themes that you can choose from, which include simple to complex, and modern and retro.
PCalc is a great tool for students, teachers, and anyone who requires a calculator. It simple, however it can be as complex as you want it to be. One of my favourite features of PCalc is that you can customize the keys any way you want them. For example, if the 2nd function button is in the wrong place, just hold down on it and move it around. You can customize your calculator to however you want it, and its great. PCalc also allows you to select different horizontal and vertical layouts, and once again, you can edit all of these themes to your hearts content.
PCalc offers an app for the Apple Watch. Whilst I have not got an Apple Watch, so I obviously cannot test it, I’ve had a few watches of videos online about it, and it looks great. It’s a full calculator – and that includes RPN, at your wrist. It looks powerful, and I have to admit, it looks very convenient and useful. It also allows you to convert units on the spot, which is pretty useful – and that includes a tip calculator.
One of the most useful features in my opinion is the slide over mode and the split view. This lets you keep typing or writing your notes whilst having your calculator, meaning that you won’t need to keep switching screens. Its really useful, and a great feature to have. I also love the today widget that PCalc has. You can choose between a simple calculator widget, or a scientific calculator. This is great for quickly swiping down and inputting the sum or equation quickly into the calculator, and I have found it very useful and quick.
Undoing and redoing calculations is very easy with PCalc. Simply swipe left or right on the calculator display to find your past calculations. Its quick, easy and simple, and works great. PCalc also offers a ticker tape, allowing you to keep track of your calculations easy. It’s pretty useful when doing large or multiple step calculations. You can also convert units with PCalc. It comes with a lot built in, but you can add more manually if you want or need to.
All in all, PCalc is a great calculator app. The features mentioned in the post are only some of them, and there are too many to write down. It’s available on the App Store for £7.99, and I really recommend that you go and check it out. It certainly has replaced my physical calculator, and I am pretty sure that it will replace yours too!
One of Pokemon’s most popular feature is shiny Pokemon – ultra rare Pokemon that come in different colors to the standard Pokemon. With very low chances of catching one (1/4096), they are extremely hard to find and encounter in the wild, and often people go to great lengths to find one.
All ways of shiny hunting are time consuming and take many hours, however one of the most popular ways is SOS chasing. In Pokemon Sun and Moon, a new feature was brought in, where Pokemon call for help during battle when they have low HP, and an ally Pokemon may appear.
SOS chains takes advantage of this. As the number of ally Pokemon you have called increases, the chance of finding a shiny Pokemon also increases. As you set up a shiny chain, you are more and more likely to catch the shiny Pokemon you are looking for.
You don’t need to know much about Pokemon to get starting with shiny chains – they are pretty simple, and this guide will guide you through the process of understanding chains, building your own chaining Smeargle, and then catching that shiny Pokemon.
Keep reading to find a complete guide on how to catch a shiny Pokemon!