Advertisement
Home Blog Page 18

Evernote for Students: Sharing Notes for Revision

All my notes are taken in Evernote, and many of my friends also take their notes in Evernote. Evernote is great – you can share notes, and discuss them in work chat. A great way for students to use Evernote is to share revision notes in a shared notebook, which you share with your other classmates and allow them to view and edit your revision notes.

In this post, I’ll go through how I share revision notes, and how I make it easy to navigate and for others to find and use them.

We share one notebook between ourselves, which contains all the shared school information. It has things such as important documents, things about projects, and much more things that are school related.

As I write all my notes in Evernote, it’s quite easy just to simply right click on a note, and select copy to notebook. Then, I select our shared notebook, and I also select the tag option as I want to preserve the tags when they go into the notebook. If you don’t take your notes on Evernote, and take them on paper, you could always scan them in using the Evernote App Scanner for the notes you want to share. The Evernote Webclipper is also a great way to get revision notes – many of my English quotes are from websites, so I clip them and save them to the shared notebook to allow my friends to easily use them too.

So, I duplicate the notes I want to share into the single shared notebook that my friends and I have. I then make table of contents for each topic in a subject – for example, I make a table of contents for poems in English, for each book we are studying and so on. I then combine these separate table of contents into one large one for each subject (using the combine notes feature is very handy for this). You can see one of the tables for my English notes below.

This gives me the ability to see all components of a certain subject, and allows for easier navigation. I do this for all the notes I share.

You may be thinking that now there are tons of table of contents for each subject all over the place, and you would be right. What I do next eradicates this problem – I select all the subject table of contents, and merge them into one ‘master’ table of contents. This gives me a list of all the subjects, and a link to their relative table of contents, which links to each individual note.

Finally, I give the master note a reminder. This reminder ‘pins’ it to the top of the note list, and enables quick and easy access to that note wherever it is on the list.

That’s how I share notes with my classmates with Evernote. Evernote is great as it allows you to easily search notebooks too, so you can find things really quickly – for example, if you want to find a certain topic, you can search a keyword and all notes with that topic in them come up. Evernote is a great way to share revision information, and I really recommend you give it a go.

You can find my post about how to use Evernote as a student here, or sign up for free here.

Thanks for reading!
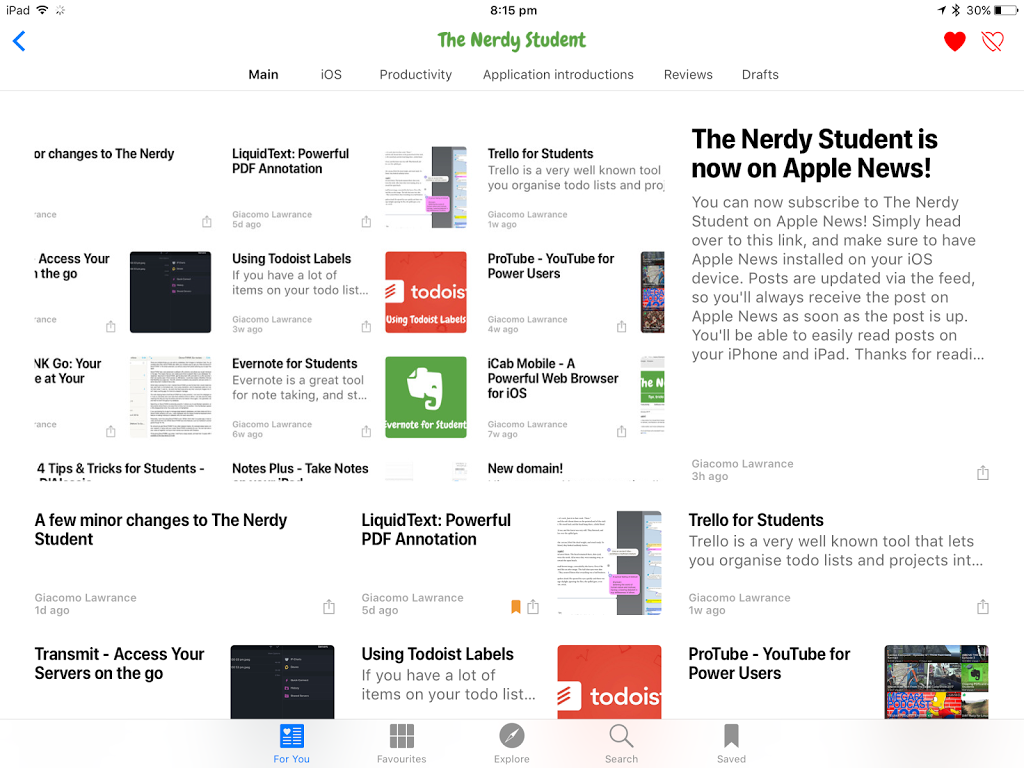
The Nerdy Student is now on Apple News!

You can now subscribe to The Nerdy Student on Apple News!

Simply head over to this link, and make sure to have Apple News installed on your iOS device.

Posts are updated via the feed, so you’ll always receive the post on Apple News as soon as the post is up. You’ll be able to easily read posts on your iPhone and iPad.

Thanks for reading, and I hope you like it!

A few minor changes to The Nerdy Student

I’ve been making a few minor changes to The Nerdy Student here and there, and wanted to share with you what these are.

Read on to find out what has changed!

To the right of posts, you’ll find a how-to tutorial on how to comment anonymously1 with Disqus. I added this as not many people knew how to do it, and this way people can follow the small guide and see how to comment.

It caught to my attention that most of the posts I have done recently are about iOS, so I’ve started doing other posts about web-apps, and about apps that work on both iOS, Mac, Windows and Android to increase my audience. I’ve done Todoist, Trello, Evernote and Opera posts in the past months, and I’m going to keep doing more posts on non-iOS specific apps, and every so often an iOS specific post.

Small changes are also coming to the looks of posts – I’ve customised the look of The Nerdy Student a little, and I’m now using Ulysses to write posts, which gives me a lot more customisation and power over the posts. You see footnotes2 appearing occasionally on my posts – I’ve always wanted to include these, but I used to have to do some difficult things with the post, but now it is a lot easier. I’m debating whether to change some other aspects of post look3, but I’m not sure. If you want anything changed, be sure to comment in the comment section!

I’ve also made a few minor changes ‘beneath the hood’, but above is everything you will see for now.

Thanks for reading!

Feel free to comment below!


  1. With Disqus, you have to select ‘Post as a guest’ at the bottom after selecting the name field. You still have to put in an email address, put you can use a random one if you don’t want to be notified of replies. ↩︎
  2. Like this. ↩︎
  3. Such as post font, etc. ↩︎

LiquidText: Powerful PDF Annotation

PDFs are one of the most used file types, and they often come with limitations. They are difficult to annotate, to change and to highlight, and generally to work on. However, LiquidText solves those problems.
LiquidText is an iOS app that allows you to annotate and work on a PDF alongside a ‘workspace’, a dedicated area where you can drag in excerpts, comment on them, and much more. You can also comment directly on the PDF itself, highlight it, link between pages and many more features.
If you find yourself working with PDFs a lot, LiquidText may be the app for you.
With LiquidText, you aren’t limited to just static comments on the PDF, like you are in many desktop and mobile apps. You can move over excerpts to the side to go into more detail and comment on them, or you can comment on the page. Using the pen tool, you can link across pages or to something in your workspace.
Before we go into LiquidText in more detail, I’ll talk about the workspace that I have been mentioning a little. The workspace is an area to the left of your document (or below if you are using the app in portrait mode) in which you can drag out excerpts of the document by highlighting the text you want and dragging it out to the workspace, comment on that excerpt and also write with a pen on it. You can also make blank text boxes where you can write on, or type in. If you want, you can also write directly onto the workspace.
The workspace

ne thing many people may like about LiquidText is the ability to write on anything you see – this includes both on the PDF and on the workspace. For example, you can underline a line on the PDF, and you can also cross out things or write over things in the workspace. This allows people that like working on paper to still get that handwriting feeling, and also allows the app to be more flexible.

LiquidText offers standard commenting features, and also offers highlighting capabilities. You can change the comment and highlight color, as well as selecting two selections of text that you want to comment on. Comments in LiquidText link back to the excerpt of text that you selected, and if you use the ‘Select More’ button, it allows you to link a single comment back to two or more areas of text.
The select more feature allows you to select separate bits of text, and have a comment link to both of them
Apple Pencil is also supported by LiquidText, meaning you can use it to take full advantage of the pen and highlighting tools that are offered at the bottom of the screen.
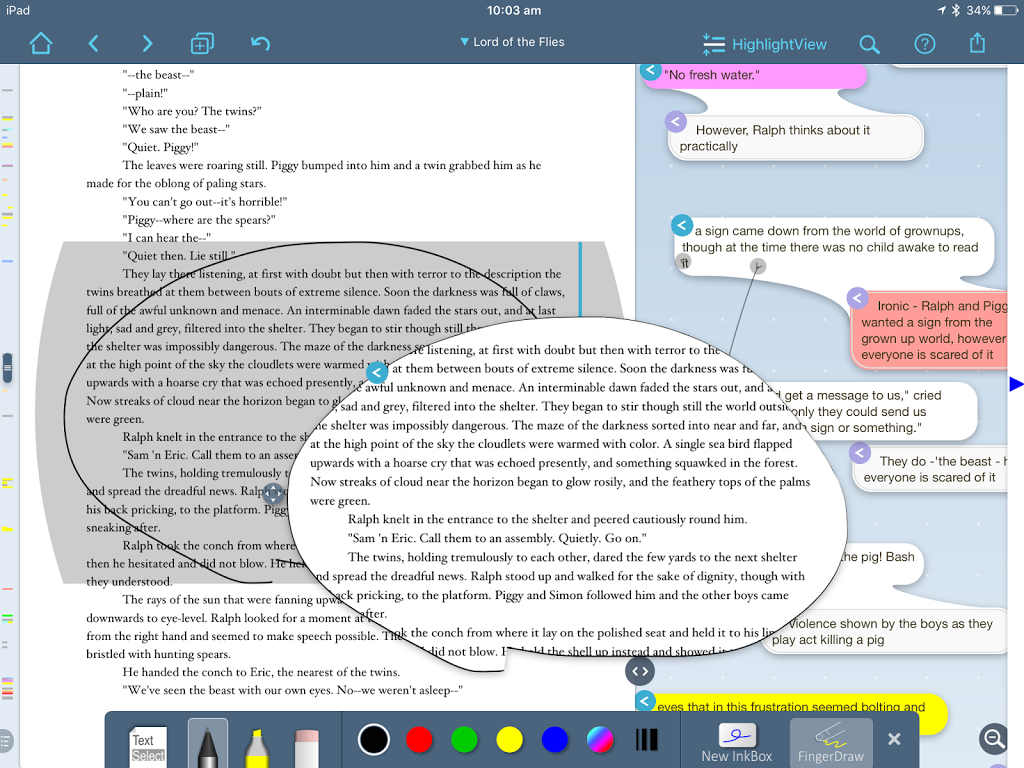
The pen tool also has another cool and handy feature – you can draw a circle or box around anything you want to excerpt, whether that is an image or text, and pull it out as an excerpt. 
Circling some text, and then pulling it out as an excerpt

A feature of LiquidText that certainly impressed me is the feature that allows you to link between pages and between the workspace. For example, if you were annotating a book and you found a reference to something that occurred much earlier in the book, you may want to link it. LiquidText allows you to compress the pages in between by pinching above the quote you found, and compressing the document until you get to the other quote. Then, the pen tool can be used to create a link between those two places, across the page. When you expand the compressed section again, the link stays, and you can tap on it to compress the section quicker and see the other quote. This can also be done with linking the document and the workspace.

Linking across the workspace, and then across compressed pages

I was also impressed by the highlighting merge option. Here, you select ‘Highlight View’, and you pinch on the screen as if you where compressing pages. However, it compresses but continues to show the highlights. This view is great if you want to see just the important bits you have highlighted.

Using the Highlight View
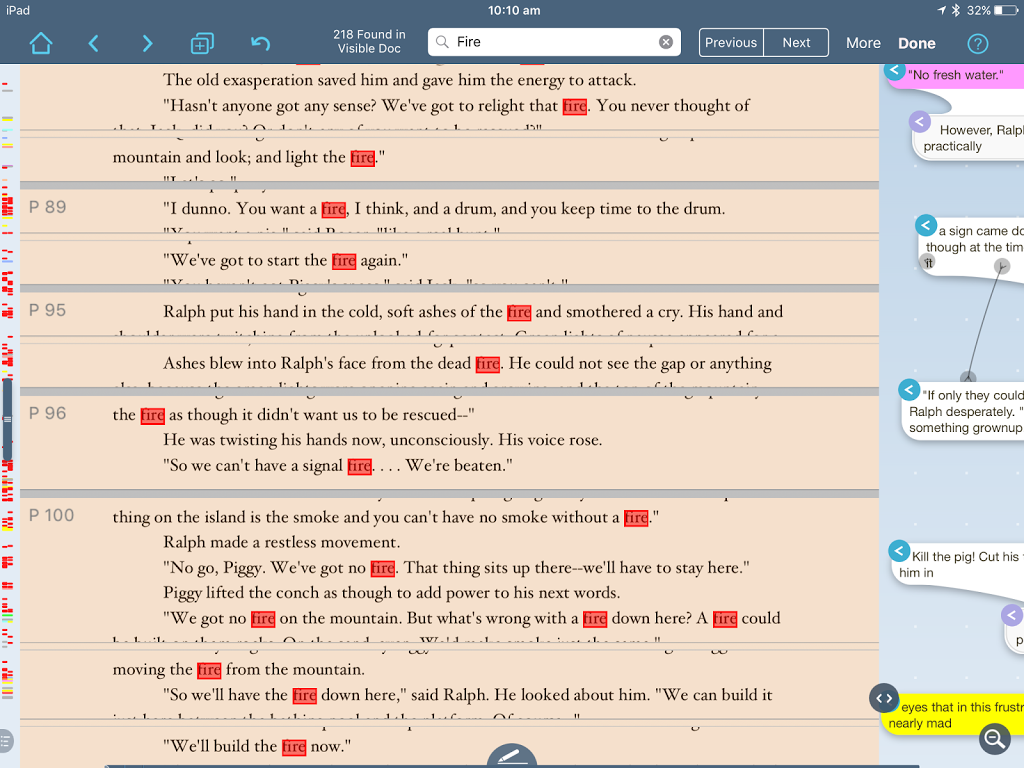
Documents can be searched in LiquidText. Whilst the search isn’t particularly different or more powerful than other apps, it does have a handy feature that is similar to the Highlight View. You can compress the document so only words that match your search term show up. If found this really useful as it let me quickly see all places where the term came up, and it was easier to find what I was looking for.

If you are working on multiple PDF documents, LiquidText also comes in handy. You can have a document manager, that allows you to select various documents that you want to work with. Then, you can use the Document Panel that appears to the left of the screen to drag in pages into the document you are working on, and you can link between those documents and compare and contrast them.
LiquidText has multiple cloud storage services, including Dropbox and Box, so you can back up your documents in case your device gets damaged. LiquidText also offers lots of exporting features, such as exporting it as a LiquidText file that you can share with other LiquidText users, or exporting it as a standard PDF document. Note that only comments and highlights will show here, not linking between pages.
I’ve found LiquidText to be extremely useful in highlighting the book I have been studying in English, and adding more comments to it. The features LiquidText provides for document annotation is by far the best out there, and I really recommend you check it out if you find yourself handling PDFs often. 
Thanks for reading!
Feel free to comment below!

Trello for Students

Trello is a very well known tool that lets you organise todo lists and projects into visual boards. With flexible features, Trello is a powerful app that allows you to organise many aspects of your life, including personal and education aspects. It also integrates with many other services such as Evernote and GitHub, and has collaborative features that allows you to work with other people on a large group project. I’ll outline how to use Trello for managing schoolwork in this post.

Trello for Students

Transmit – Access Your Servers on the go

Update: Transmit has been removed from the App Store. FileBrowser is a good FTP/SFTP alternative.
Transmit is an app for iOS that allows you to upload files and images to FTP servers, Amazon S3, WebDAV and multiple other servers across the internet.

One major block I came across whilst programming in iOS was the fact that it was extremely difficult to upload to an FTP client on your iPad or iPhone. I found some inline solutions, but they were pretty clumsy and didn’t really work as wanted.

After searching around on the App Store, I found Transmit, which is an app that allows you to upload documents and images from your iPad to various services around the internet. The one that attracted me was FTP access, which I use for multiple websites that I have.
Transmit has a simply interface, and it’s extremely easy to get started with. Simply add your server, with the relevant info for each, and you are good to go.
Transmit offers many well-known services, including FTP and SFTP, and even Amazon S3
When you tap to open the server, Transmit comes up with all the files in the server, just like you where browsing it on a PC. You can upload images, documents from iCloud or other cloud storage platforms, and you can even edit the files you find in the server locally (note that they will have no syntax highlighting). If you are a user of Coda, a programming app also by Panic, you’ll be interested to know that out can open a file form Transmit into Coda, edit it, and then send it back to Transmit where it is updated on the server.
Files can be dragged across to the server
I’ve found that Transmit has been working flawlessly for me – I’ve had no problems, either on the server side or on the app itself. The app is quick and easy to use, and I’ve found that my files have uploaded quickly, and they aren’t corrupted.
A share extension is also offered by Transmit, meaning you can select multiple images directly from the images app, or use the share extension in another up to upload different file types to a server via Transmit.
Transmit also supports the Share Sheet extension, which you don’t find many apps using, and it’s nice to see extra functionality built into the app. You can easily pull in files from your servers into apps such as Evernote and other apps that use the share sheet functionality.
A cherry on the topping of Transmit is it’s integration with Workflow, which allows you to make complex actions that upload files to your server. Panic also offers Panic Sync, which allows you to sync your setting across devices that use Panic Sync.
If you find yourself away from home a lot, and wanting to update, change, or download something from a server, Transmit is the best option for iOS out there. It’s helped me update my websites on the go from an iPhone, and when I’m away from my computer on holiday. Transmit is a must for a web developer, and people who use servers to store files and images. Transmit is available on the App Store at £9.99.
Thanks for reading!
Feel free to comment below!

Using Todoist Labels

If you have a lot of items on your todo list, you may be overwhelmed by the sheer amount of things you need to do. However, if you use Todoist, you may find a premium feature handy – labels. Labels allow you to assign tasks a specific label, and you can assign tasks with as many as these labels as you want. Labels allow you to see only the tasks that you want to see, and filter out the tasks you don’t.

Note that labels are a premium feature, so you may want to check out Todoist Premium is you do not already have it.

Planning out your labels may take some time, but it will save you a lot of time in the long run. You’ll be able to order the tasks by a specific label, and then view all the tasks with that label.

There are a few ways to create a label – the first, and my preferred way, is to simply create your label whilst entering a task. To do this, you put in your task, and then start typing the label by writing ‘@’, and then the label name you want. A small popup will appear over it, and you can press enter to create the label.

Quickly adding labels via the input section

Of course, you can click on ‘Create Label’ in the labels section, but I find that it takes some more time to do it that way.

One thing I suggest when setting up your labels is to keep them at a manageable size. If you have hundreds, it can a bit over complicated and the point of labels can defeat the use of them, as they will just confuse you.

A great advantage of labels is that you can add multiple labels to the same task, and you can also create custom filters that allow you to filter with multiple or single labels (filters are to be covered in a later post). Therefore, you could have a label that is ‘online’, and ‘computer’. A filter then could be created that shows all tasks with only those two labels, and you could call that filter ‘Online computer’. I use something like this to label tasks that require me to be online on my computer, such as posting a blog post or programming something that requires me to be online and on my computer.

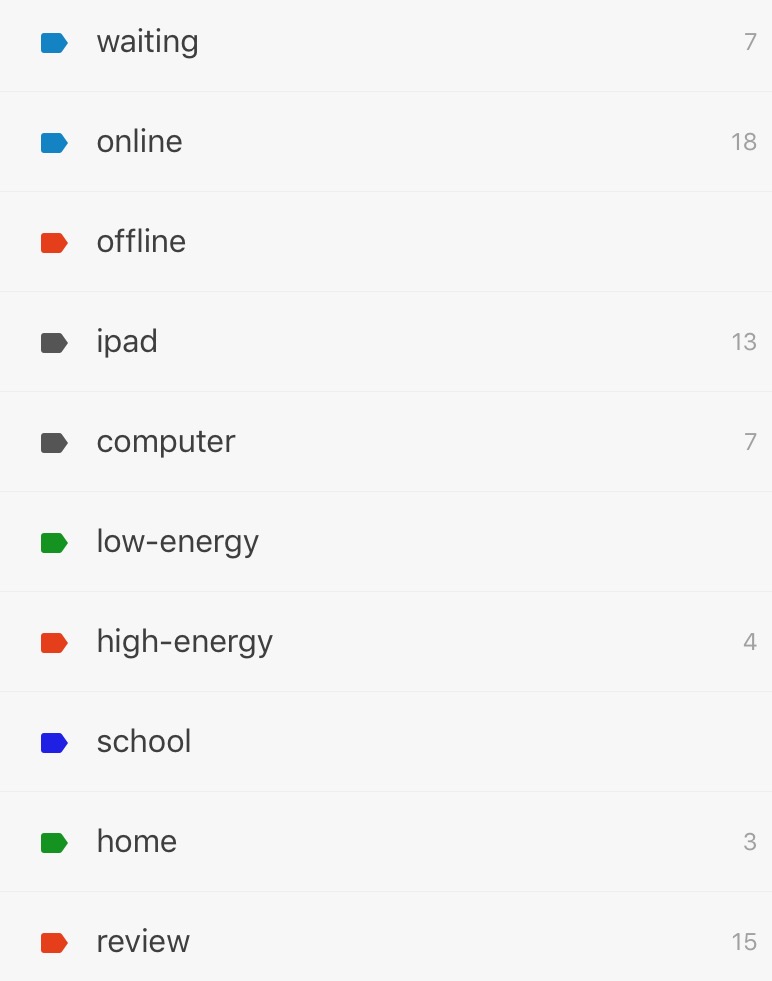
I’ll share my labels below, and also give a little bit of info on how I use them.

Waiting
I use this label to label tasks that I need someone to do something before I can complete it. For example, I may want to improve some work that the teacher still needs to give me, and I would label the ‘Improve work’ task with the waiting label.

Online
This is one filter I use a lot – it means that I have to be online to complete that certain task, and it cannot be completed offline. An example of this would be if I wanted to make a change to a blog post.

Offline
This task is given to tasks that I can complete when I am offline.

iPad (phone/tablet)
Once again, this is one of my more commonly used labels. I give this to tasks that I need my iPad to complete – for example, reviewing an app that runs on iOS would require my iPad, and I would give it this label.

If you don’t have an iPad, or use Android, you can change this to say ‘Phone’ or ‘Tablet’.

Computer
This label denotes something that requires me to use my computer, such as updating a blog post, or doing something in a desktop game.

Low energy & high energy
These labels are pretty useful, and I use them quite a bit. ‘Low energy’ is for tasks that are quick, and won’t really take up much energy, like a quick worksheet from school, or any other tasks that won’t be too ‘mentally’ taxing or difficult.

‘High energy’ is for something completely different. It’s for big tasks that will take a while and require a lot of energy, and isn’t something I want to do when I’m tired. I often find myself placing larger pieces of homework here, such as exam papers and projects.

School and home
These two labels are location based labels. When I tag a task with one of them, it means that I need to be at that location to complete it. If I forget to hand in homework, I give it the ‘School’ label, as it can only be completed at school. I also find that a location reminder added to this task makes sure that I don’t forget to do it.


I have been considering adding a ‘morning’, ‘afternoon’ and ‘evening’ labels to break up my day, however I’m lucky that I don’t have that many tasks to do. There are some interesting label ideas that you can check out on the Todoist blog.

So, Todoist labels are certainly a great and powerful tool that allow you to filter down your tasks to chunk up your day and make it easier for you to use. I really suggest you check them out and give them a go if you are already not using them.

If you’re not using Todoist in general, I suggest you give it a try and see if you like it yourself. You can check out my review of Todoist Premium here.

Thanks for reading!

Feel free to comment below!

ProTube – YouTube for Power Users

Update: As of September 2018, ProTube has been removed from the App Store.

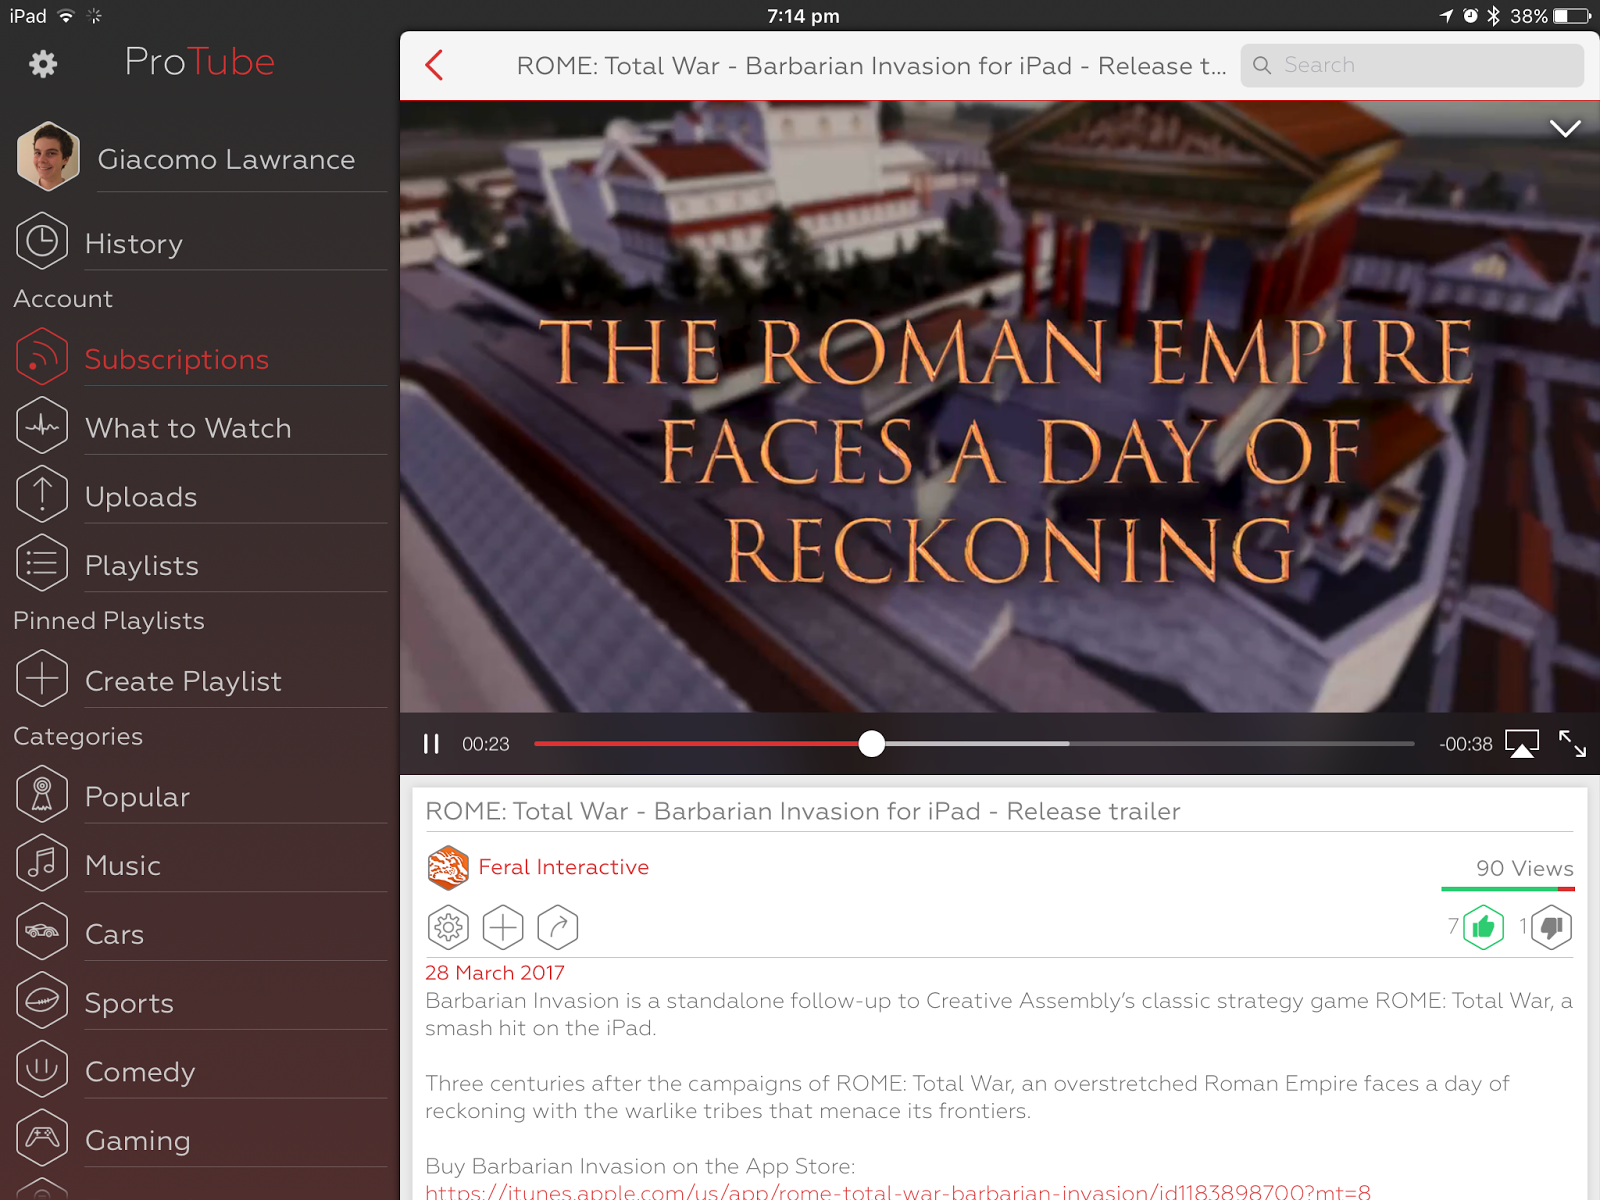
ProTube is a highly customisable YouTube app for iOS. It puts you in control of the app, and has multiple features that you won’t find in the YouTube app. Some of these are picture in picture viewing, no ads, custom playlists, audio playback whilst working in other apps and more. If you watch a lot of YouTube videos on your iPad and iPhone, you may want to check it out.

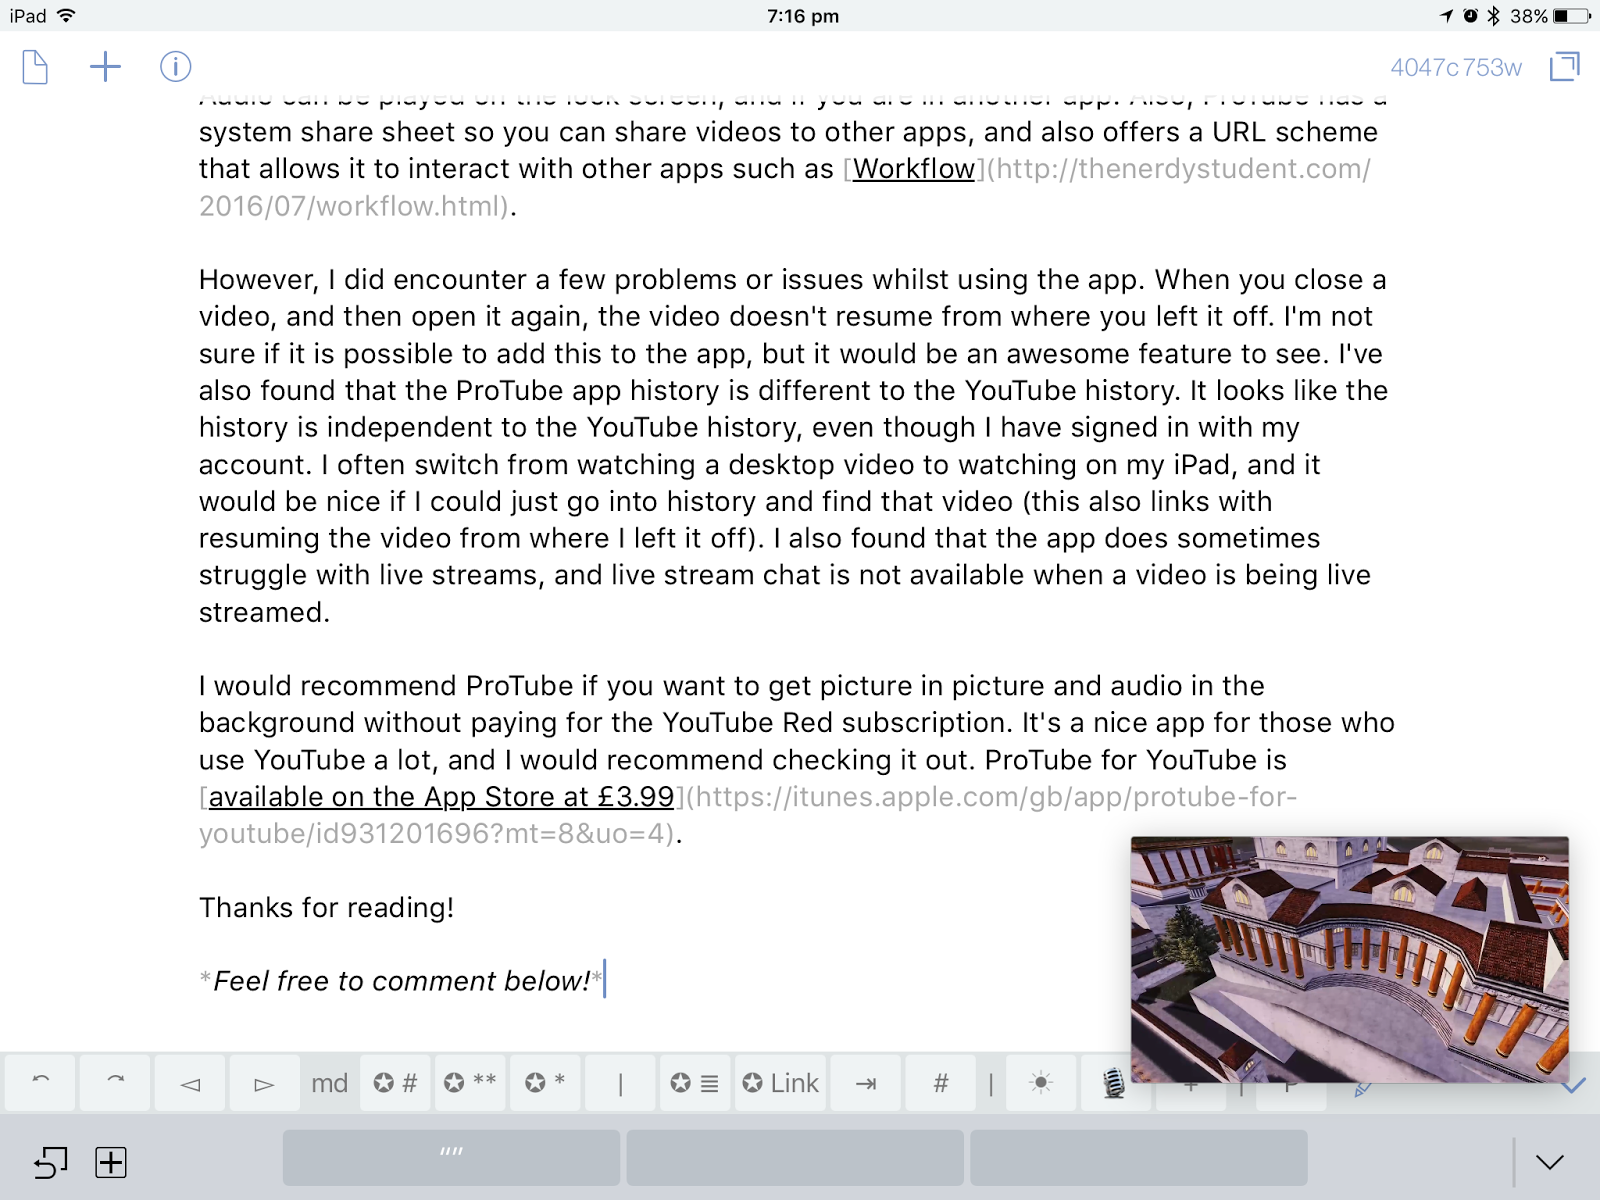
One of my favourite things about ProTube is the ability to watch a video whilst working in another app – I can watch a video about the subject I am working on, and take down notes on it, or I can watch a gaming video whilst working in another app. Whilst picture and picture is available in the YouTube app, but you’ll need YouTube Red to use it. ProTube also allows you to use split screen viewing when you use it, which is also another very nice feature.

Writing in Drafts 4 whilst watching a video

Another of my favourite features is that you can pick what section of the app you want the video to start in. For example, I have set the app to start on the subscriptions section. The default section is the popular section, but often videos do not really appeal to me there, and I would rather catch up with my subscriptions.

ProTube also gives you ad free videos, so you don’t need to wait for the ‘Skip Ad’ button to appear, and you don’t need to watch YouTube ads over and over again. It gives a better viewing experience, and means you can watch the videos that you want to watch without waiting around for the YouTube ad to end. Another one of my favourite features is the peak and pop ability, so you can see if the video interests you.

If you use data a lot, and you often find that YouTube drains it, you’ll be glad to know that you can set specific playback resolutions depending on whether you are on WiFi or data. Playback quality can be changed whilst you are watching a video, and it ranges from the lowest quality, 144p, to 4K resolution. You can also change the playback speed of the video.

Playlists are another interesting feature of ProTube. You can use ProTube as a music streaming app, as you can play audio without having the video play. If you want to use it like this, you can add the music you like to the playlist, and then stream the music. Another nice feature is that it allows you to listen to audio whilst you are in another app, which is a YouTube Red feature. If you don’t have a YouTube/Google account, you don’t need it to create an account to playlists, which may appeal to those who do not have a YouTube account.

Audio can be played on the lock screen, and if you are in another app. Also, ProTube has a system share sheet so you can share videos to other apps, and also offers a URL scheme that allows it to interact with other apps such as Workflow.

However, I did encounter a few problems or issues whilst using the app. When you close a video, and then open it again, the video doesn’t resume from where you left it off. I’m not sure if it is possible to add this to the app, but it would be an awesome feature to see. I’ve also found that the ProTube app history is different to the YouTube history. It looks like the history is independent to the YouTube history, even though I have signed in with my account. I often switch from watching a desktop video to watching on my iPad, and it would be nice if I could just go into history and find that video (this also links with resuming the video from where I left it off). I also found that the app does sometimes struggle with live streams, and live stream chat is not available when a video is being live streamed.

I would recommend ProTube if you want to get picture in picture and audio in the background without paying for the YouTube Red subscription. It’s a nice app for those who use YouTube a lot, and I would recommend checking it out. ProTube for YouTube is available on the App Store at £3.99.

Thanks for reading!
Feel free to comment below!

DevonTHINK Go: Your Knowledge at Your Fingertips

DevonTHINK Go is a powerful tool for managing large text databases made up of text files, images, web clippings and PDFs. Think of it as a mix between file manager and research database, allowing you to save your images, web clippings and PDFs in the same place you have written up your essay draft.

DevonTHINK works in a world of databases and groups. Databases are the catch all, and then inside of them you have groups. You can still save things into a database without groups, however it’s a lot better organised if you use groups to sort out your files. The app also allows you to sync your databases, and a great advantage of this is that you can selectively sync individual databases, and also encrypt them with a key if you want. On demand downloading is also available, saving space on your device.

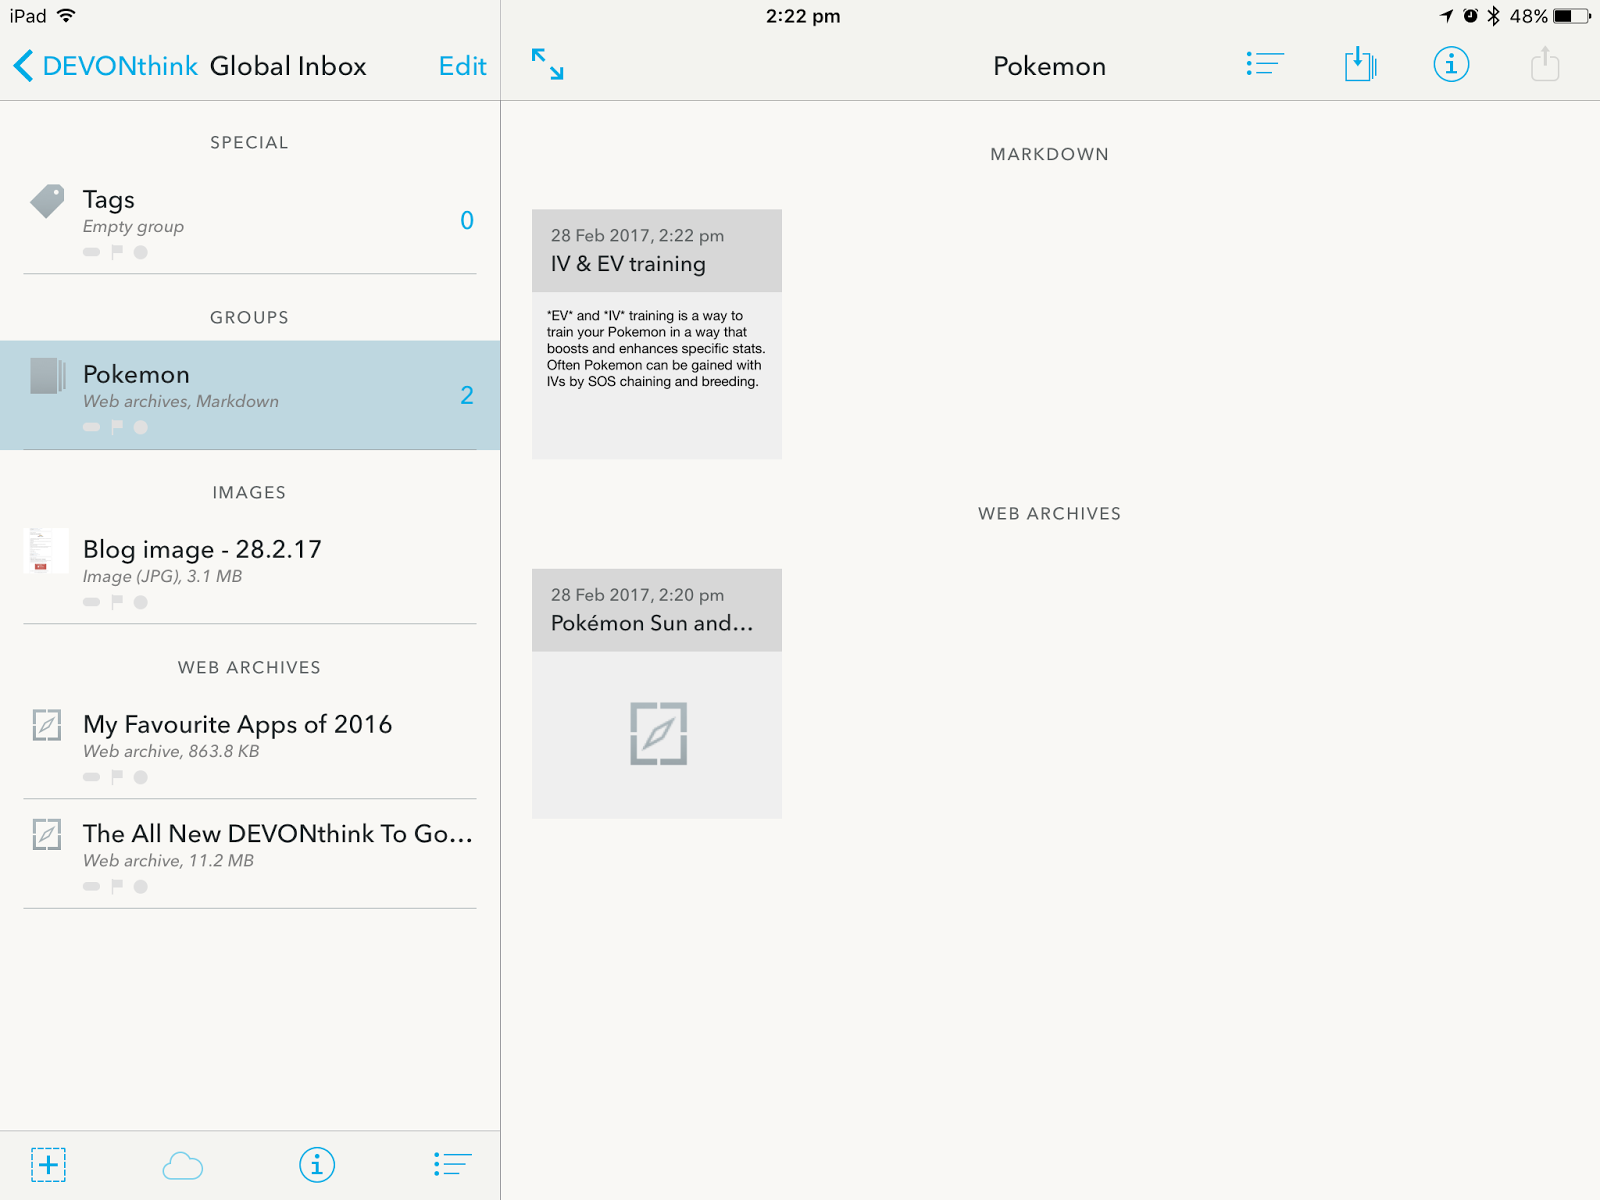
When you open DevonTHINK up for the first time, you’ll come across the Global Inbox. This is the default database, where everything you quickly save goes to. You can create groups and tasks in this too. You can create as many databases as you want, and they appear under the Global Inbox. In those databases you can create groups, which further organise your files and items. You can create groups in these groups, and so on. It’s very flexible, and it’s easy to manage your files in the app.

There are multiple things you can add to a database, from images to markdown text. You can add recordings, PDFs and multiple other files. DevonTHINK also offers you multiple ways to get your files into DevonTHINK. It has a ‘Clip to DevonTHINK’ in the share extension, as well as a document picker allowing you to open files in DevonTHINK in other apps.

DevonTHINK support’s a wealth of different file formats (click to enlarge)

DevonTHINK has a very advanced x-callback-URL scheme, and allows you to get individual URLs for every document in the app. This means that you can create quick links to specific files in your database. For example, I could have a ‘pipelines’ document in DevonTHINK, get the document URL and add it to a URL launcher in Launcher Pro. This means that I can quickly open it from across my iOS device. I could also create a Workflow that opens the URL, and then save that Workflow as a app icon. The URL scheme is certainly very powerful, and can come in very handy if you refer to the same document multiple times a day.

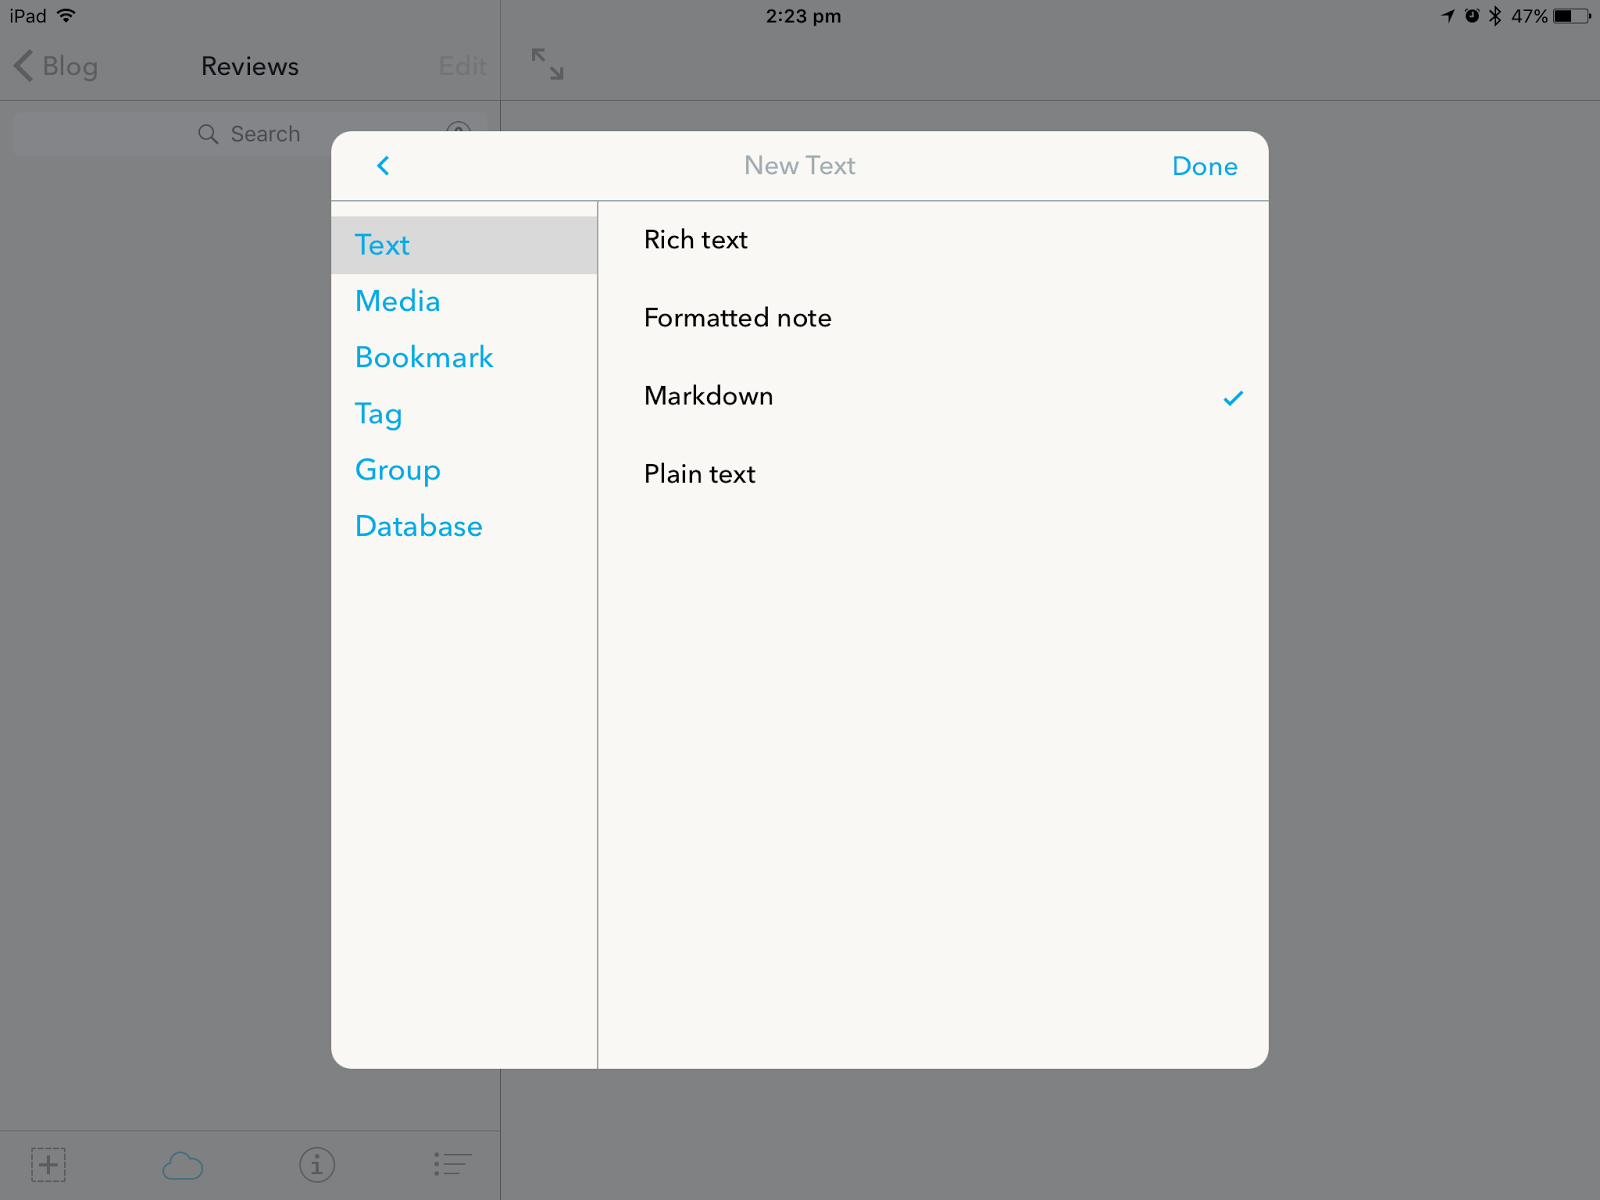
What really surprised me when I started DevonTHINK up was the fact that I could create text notes in markdown, rich text, plain text or a formatted note. I love using markdown, and it’s especially useful as I can also create plain text and rich text notes if I want to. I do wish that there was some way that I could put images into my notes, but DevonTHINK isn’t really a writing app, it’s more of a research manager.

The web clipping feature that DevonTHINK is pretty powerful, and renders some great results. I can save the webpages as they are, and view them as if I was on a browser, and I can view them whether online or offline. I can also save the webpage through Instapaper, meaning that they are only the article and look a lot cleaner. Once again, I can generate a document link for these clips and refer to them throughout my database.

Searching on DevonTHINK is extremely powerful. It allows you to use Boolean operators, and you can search for documents where there is one result that is there, but not another. I find the Boolean operator very useful, however I was a little disappointed when the words were not highlighted.

If you are looking for an app to manage large research databases, and take notes and link around that database, DevonTHINK certainly is for you. I was impressed with the range of external keyboard shortcuts, and I certainly love the feature of making individual x-callback-URL’s for each document.
One thing that I would like to see is the ability to sync using iCloud. Whilst it already supports services such as Dropbox, I’ve found that iCloud sync is very reliable, and I would like to see compatibility with iCloud.

Personally, I won’t be using DevonTHINK much. Whilst I think that it is a great app, it has no Windows counterpart, and I also use Evernote a lot. Whilst DevonTHINK has more features, such as markdown and better search, Evernote is good enough for me.

So, should you get DevonTHINK? If you often research topics, for example essay topics, and want a database to put all your research in along with your notes, DevonTHINK is certainly for you. You can clip web articles, have photos and your notes all together, and sync them across your devices with Dropbox.

I’ll be giving DevonTHINK a go when I next have a large project, and see how it copes with that. DevonTHINK is available on the App Store at £14.99.

Thanks for reading!
Feel free to comment below!

Evernote for Students

Evernote is a great tool for note taking, and students are some of the people that take the most notes. I’ve written a post about how I use Evernote in general, and this post is about how I use Evernote to take notes.

Advertisement